
SharePoint Online Has No Storage Alerts — Here's How to Build One
If you manage a Microsoft 365 tenant, you probably already know that the SharePoint admin center shows your current storage usage. What it doesn't do is warn you when your tenant is about to run out of storage.
Instead, everything looks fine—right up until it isn't. Then suddenly it looks like you're not doing your job, people are annoyed, and you're explaining why SharePoint is sitting at 101% capacity.
But build this, and you'll be able to strut around the office like the proactive Microsoft 365 admin you always knew you were.
Enter Azure Automation.
SharePoint Online has no native tenant-level storage capacity alert. Individual SharePoint sites can notify site owners when they approach their storage quota, but Microsoft 365 doesn't provide a built-in alert that monitors your total SharePoint Online tenant storage and warns administrators before capacity is exceeded.
I discovered this the fun way: our SharePoint tenant had quietly reached 101% of its storage capacity and was already accumulating overage charges—with no alert to tell us we'd crossed the limit.
So I built the alert Microsoft doesn't provide.
In this guide, I'll show you how to create an automated SharePoint Online storage alert using Azure Automation, PnP PowerShell, and certificate-based authentication. The runbook monitors your tenant's available SharePoint storage and can notify you before you hit your storage limit—before your users, your boss, or your finance team notice it first.
I'll also cover the four separate ways I managed to break the solution before it finally worked, how I diagnosed each problem, and what you need to do to get the automation running reliably.
By the end, you'll have a hands-off SharePoint storage monitoring system that keeps an eye on your tenant for you—and, more importantly, gives you the chance to fix the problem while you can still pretend you had everything under control the whole time.
What We’re Building
The idea is pretty simple.
Every 12 hours:
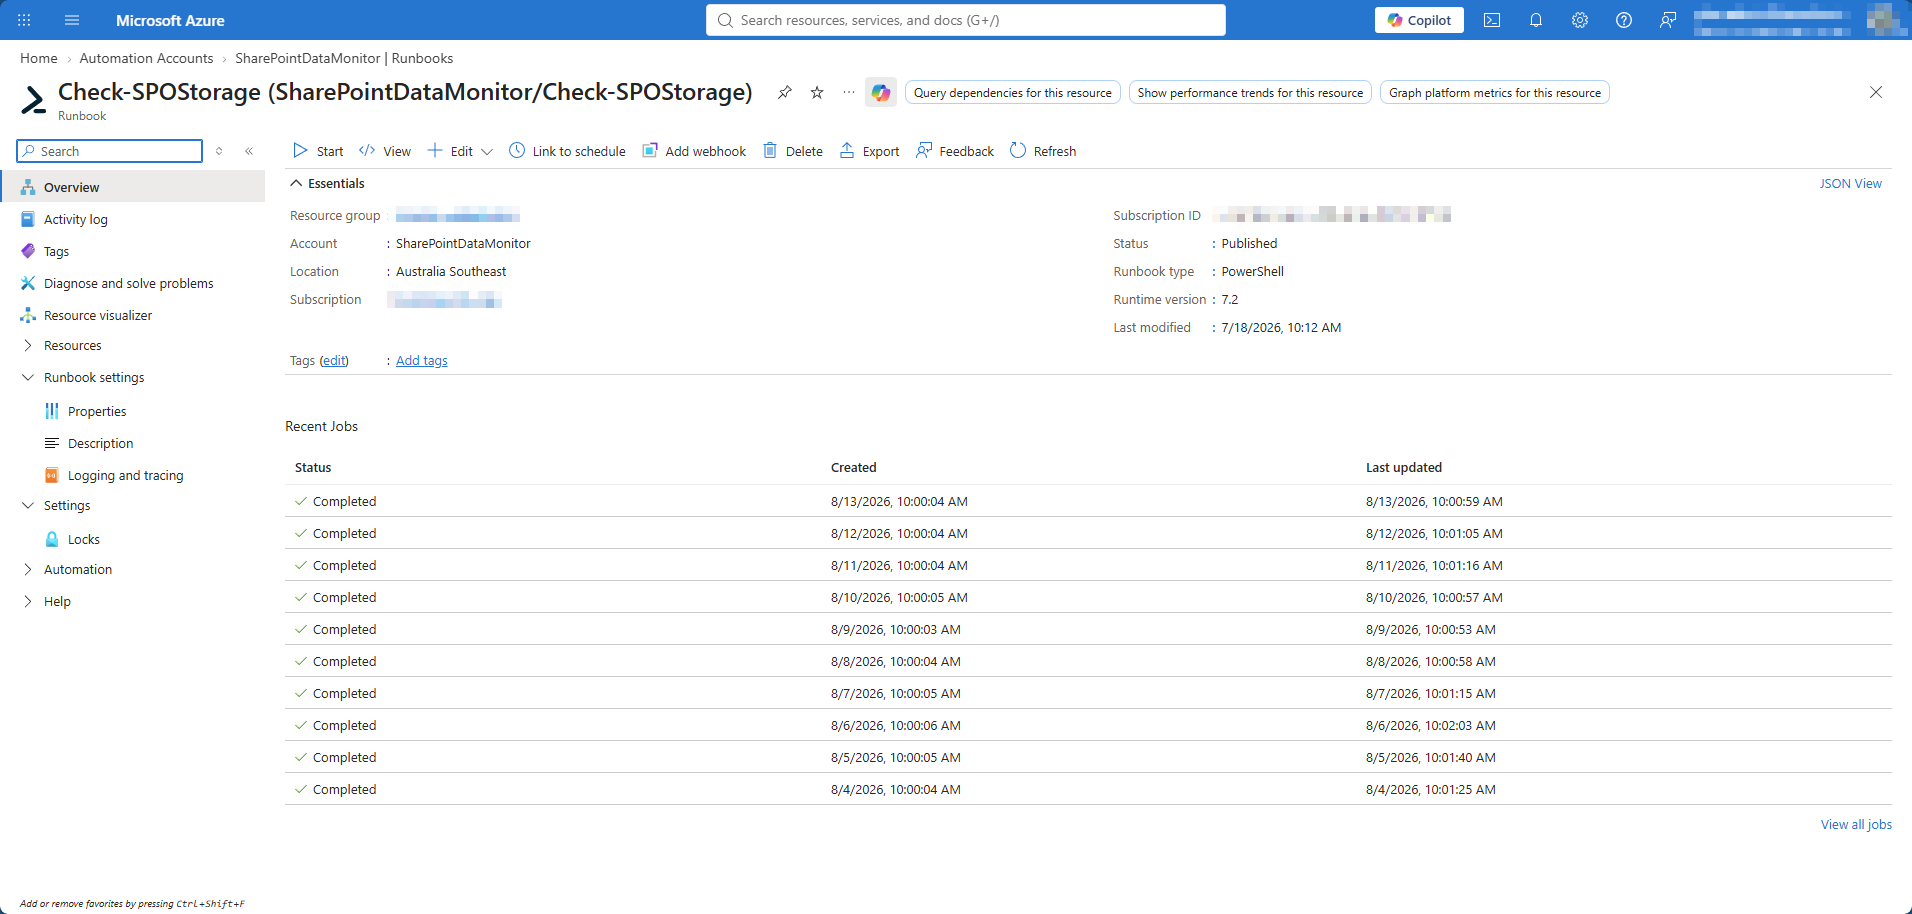
Azure Automation starts a PowerShell runbook.
The runbook authenticates to Microsoft 365 using a certificate.
PnP PowerShell retrieves the tenant's total SharePoint storage quota.
It calculates how much storage your SharePoint sites are currently using.
It works out the percentage consumed.
If that percentage is above your threshold—in my case, 95%—it sends an email.
The email includes links to investigate the problem and to the internal documentation explaining what to do next.
If everything is fine, it does nothing.
That's exactly what I wanted.
I don't need another dashboard to remember to check.
I want something to tell me when I actually need to care.
What You’ll Need
Before starting, make sure you've got these lined up. Most of the friction in a build like this comes from discovering halfway through that you're missing access to something.
Microsoft 365: You'll need a Microsoft 365 tenant with SharePoint Online and sufficient administrative rights to create and consent to the application permissions required.
Azure: You'll need an Azure subscription with an active billing profile.
The Automation Account itself costs next to nothing at a few runs per day—mine costs less than 10 cents a month—but you'll still need an Azure subscription to create it.If your company doesn't already have an Azure footprint, getting the subscription and billing side sorted may take longer than building the actual automation.
Exchange Online Administrator access: We'll be restricting the application's email permission so it can only send as our designated alert mailbox rather than every mailbox in the tenant.
That requires Exchange Online administrative access.
PowerShell 7: You'll need PowerShell installed locally for the initial setup. It's worth checking what you're actually running before doing anything else:
$PSVersionTable.PSVersion
We'll come back to PowerShell versions later because this caused one of the more annoying problems in the entire build.
A machine to perform the initial setup: Windows, macOS or Linux is fine.
Once everything is configured, the monitoring happens entirely inside Azure. Your computer doesn't need to stay switched on.
Step 1: Create the Entra ID App Registration
The first thing we need is an application identity that Azure Automation can use to authenticate to Microsoft 365.
Rather than putting a username and password into a script, we're going to use certificate-based app-only authentication.
PnP PowerShell gives us a very convenient way to create most of this.
Open PowerShell 7 and run:
Install-Module PnP.PowerShell -Scope CurrentUser
Import-Module PnP.PowerShell -Force

Register-PnPEntraIDApp -ApplicationName "SPO-Storage-Monitor" `
-Tenant yourtenant.onmicrosoft.com `
-SharePointApplicationPermissions "Sites.FullControl.All" `
-OutPath "C:\temp\spo"
This creates the Entra application and drops a .pfx and .cer certificate pair to c:\temp\spo.
It will also give you the application's App ID and certificate thumbprint.
Keep those handy—we're going to need them shortly.
One security thing worth knowing
The console output includes the certificate's private key as a base64 blob.
Yes, right there in your terminal.
Once you've grabbed the information you need, clear your terminal history. That's not something you want sitting around in scrollback forever.
Step 2: Add Microsoft Graph Mail.Send
Our application can now authenticate to SharePoint, but eventually we want it to email us.
For that, it needs Microsoft Graph permission.
Go to:
Azure Portal → Microsoft Entra ID → App registrations
Open the application you just created:
SPO-Storage-Monitor
Then go to:
API permissions → Add a permission → Microsoft Graph → Application permissions
Add:
Mail.Send
Then grant admin consent for the permissions.
We're using an Application permission because there won't be a human signing into this automation every 12 hours.
That creates another problem, though.
Mail.Send as an application permission is extremely powerful. By default, the application could potentially send as mailboxes across the tenant.
We don't want that.
We'll lock it down shortly.
Step 3: Create the Azure Automation Account
Now we need somewhere for our PowerShell to live. If you've never used Azure Automation before, don't worry—I hadn't either when I started this.
Go to the Azure Portal and search for:
Automation Accounts
(https://portal.azure.com/#browse/Microsoft.Automation%2FAutomationAccounts)
Select:
Create
Choose:
Your Azure subscription
A resource group
A name such as SPO-Storage-Monitor
Your preferred Azure region
Then select:
Review + Create → Create
Once Azure finishes deploying it, select:
Go to resource
Welcome to the place where most of the rest of this build happens.
Step 4: Know Where Things Live in Azure Automation
Azure has an impressive ability to put the thing you need three menus deeper than you expect. There are a few areas inside the Automation Account that are worth understanding before continuing.
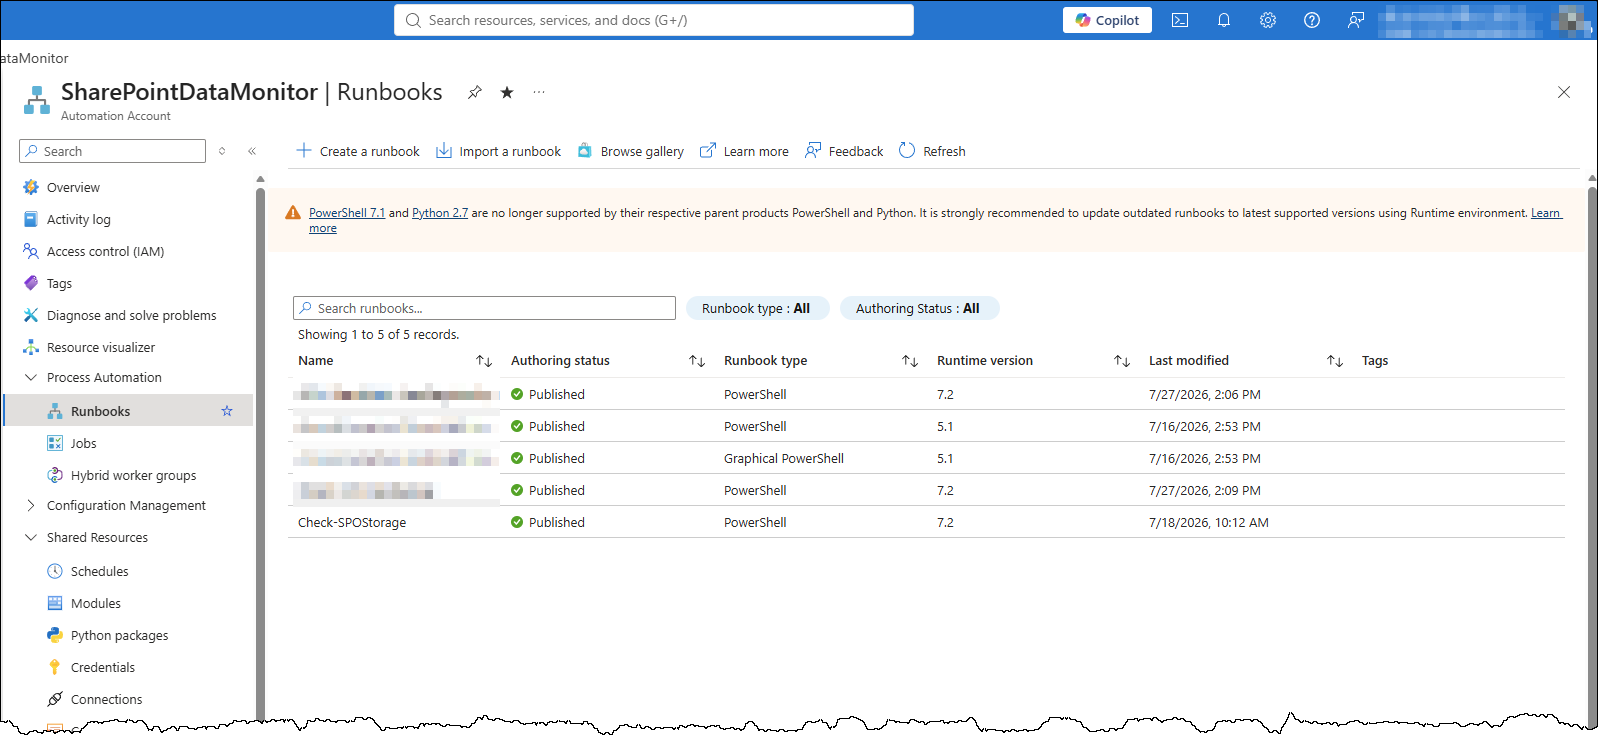
Runbooks
Go to:
Process Automation → Runbooks
This is where our PowerShell script will live.
It's also where you'll test, publish and monitor it.
Runtime Environments
Go to:
Process Automation → Runtime Environments
This determines which PowerShell runtime and packages your runbook uses.
Pay attention to this.
Runtime compatibility between Azure Automation and PnP.PowerShell caused me considerably more grief than the actual PowerShell script.
Certificates
Go to:
Shared Resources → Certificates
This is where the certificate used to authenticate to Microsoft 365 will live.
Variables
Go to:
Shared Resources → Variables
Rather than filling the PowerShell script with tenant IDs, application IDs and email addresses, we'll store those values here.
Schedules
Finally:
Shared Resources → Schedules
This is what will eventually make the runbook execute automatically.
Once you know where those five things live, Azure Automation becomes much less intimidating
Step 5: Add the Automation Variables
The runbook needs some information about our environment.
Rather than hard-coding all of it into the script, create Azure Automation Variables.
Go to:
Automation Account → Shared Resources → Variables → Add a variable
Create all of these variables:
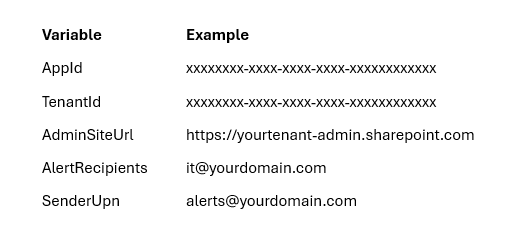
If you want multiple recipients, separate them with commas:
admin@yourdomain.com,it@yourdomain.comThe runbook can then split them into separate addresses.
The nice thing about doing it this way is that if you need to change an email address or tenant setting later, you don't need to edit the actual runbook.
Step 6: Upload the Certificate
Next, we need to give Azure Automation access to the certificate created earlier.
Inside the Automation Account, go to:
Shared Resources → Certificates → Add a certificate
Call it:
SPOStorageCertThe name matters because that's the certificate name our runbook will request.
Upload your .pfx certificate.
And this is where I encountered an issue… The certificate generated by Register-PnPEntraIDApp didn't have a password.
Azure's certificate upload interface, however, had other ideas:
"password cannot be empty."
Fair enough, Azure.
I re-exported the certificate with an explicit password:
$flags = [System.Security.Cryptography.X509Certificates.X509KeyStorageFlags]::Exportable
$cert = New-Object System.Security.Cryptography.X509Certificates.X509Certificate2 -ArgumentList $certPath, "", $flags
$newPassword = ConvertTo-SecureString -String "YourPasswordHere" -AsPlainText -Force
$bytes = $cert.Export([System.Security.Cryptography.X509Certificates.X509ContentType]::Pfx, $newPassword)
[System.IO.File]::WriteAllBytes("$certPath-protected.pfx", $bytes)
Upload the newly protected .pfx and enter the password.
Azure can now securely store the certificate and make it available to the runbook.
Step 7: Add PnP.PowerShell to the Runtime
Our runbook relies on PnP.PowerShell, so Azure Automation needs access to the module.
This is where I lost a good chunk of my afternoon.
When I originally built this, my Azure Automation PowerShell runtime was 7.2, while the current release of PnP.PowerShell required PowerShell 7.4.
The module appeared as Available.
The runbook looked fine.
Then every PnP cmdlet came back as:
The term '...' is not recognized as the name of a cmdlet...
Which makes you think you've imported the module incorrectly.
I hadn't.
The versions simply weren't compatible.
The workaround in my environment was to pin PnP.PowerShell to an older compatible version:
Save-Module -Name PnP.PowerShell -RequiredVersion 2.12.0 -Path C:\temp\pnpmodule
Compress-Archive -Path "C:\temp\pnpmodule\PnP.PowerShell" -DestinationPath "C:\temp\PnP.PowerShell.2.12.0.zip"
I then manually uploaded that module into Azure Automation rather than pulling the latest version from the PowerShell Gallery.
If you're building this today, check the PowerShell version of your Azure Automation Runtime Environment and the requirements of the current PnP.PowerShell release first.
Azure's Runtime Environment options have moved on since I originally built this, so you may not need my workaround at all.
The important lesson isn't "always install PnP.PowerShell 2.12.0."
It's:
Check your runtime compatibility before you spend an afternoon trying to work out why perfectly valid cmdlets don't exist.
Step 8: Lock Down Who the Application Can Email As
Remember that Mail.Send permission?
By default, application-level Mail.Send is much broader than I want for a simple storage monitor.
This automation should send email as one specific alert mailbox.
Nothing else.
I created an Exchange Application Access Policy to restrict it:
New-DistributionGroup -Name "Storage-Monitor-Scope" -Type "Security" -Members "alerts@yourdomain.com"

New-ApplicationAccessPolicy -AppId "<AppId>" `
  -PolicyScopeGroupId "Storage-Monitor-Scope" `
  -AccessRight RestrictAccess `
  -Description "Restrict app to send only as alerts@yourdomain.com"
That gives us a much more sensible security model.
The automation has the permissions required to do its job without unnecessarily giving it access to send as every mailbox in the organisation
Step 9: Create the Runbook
Now we finally get to the PowerShell that actually monitors SharePoint.
Inside the Automation Account, go to:
Process Automation → Runbooks → Create a runbook
Give it a name such as: Check-SharePointStorage
Choose PowerShell and the Runtime Environment you've configured for PnP.PowerShell.
Create the runbook and open the editor.
Step 10: The Runbook
Here's the runbook:
$cert = Get-AutomationCertificate -Name 'SPOStorageCert'
$appId = Get-AutomationVariable -Name 'AppId'
$tenantId = Get-AutomationVariable -Name 'TenantId'
$adminUrl = Get-AutomationVariable -Name 'AdminSiteUrl'
$recipients = (Get-AutomationVariable -Name 'AlertRecipients') -split ','
$sender = Get-AutomationVariable -Name 'SenderUpn'
$threshold = 95

Connect-PnPOnline -Url $adminUrl -ClientId $appId -Tenant $tenantId -Thumbprint $cert.Thumbprint

$totalMB = (Get-PnPTenant).StorageQuota
$usedMB = (Get-PnPTenantSite -Detailed | Measure-Object -Property StorageUsageCurrent -Sum).Sum
$pctUsed = [math]::Round(($usedMB / $totalMB) * 100, 1)

if ($pctUsed -ge $threshold) {
 $body = "SharePoint tenant storage is at $pctUsed%. Threshold: $threshold%."
 Send-PnPMail -From $sender -To $recipients -Subject "ALERT: SharePoint storage at $pctUsed%" -Body $body
 }

Disconnect-PnPOnline
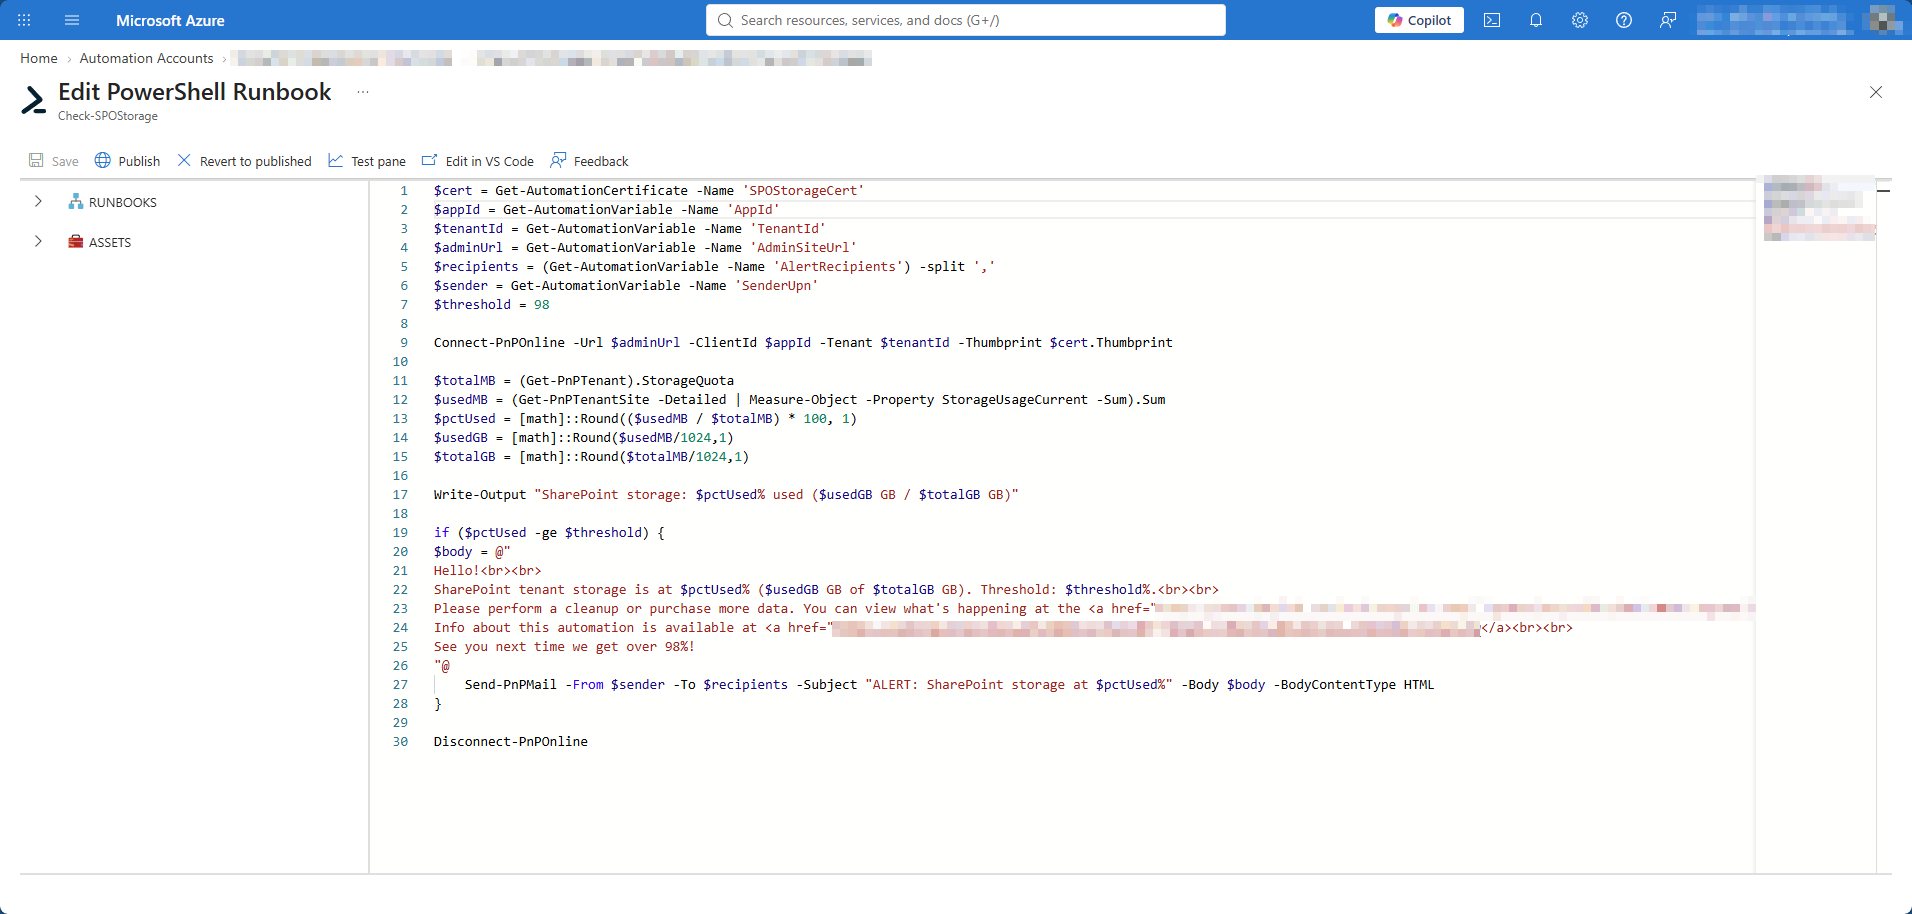
That's basically it.
After everything required to get here, it's slightly ridiculous that the actual monitoring part is only around 20 lines of PowerShell.
The script:
Retrieves the certificate from Azure Automation
Retrieves our configuration variables
Authenticates to SharePoint
Gets the tenant's total storage allocation
Adds up the storage being consumed by SharePoint sites
Calculates the percentage used
Checks it against our threshold
Sends an email if we've crossed it
There's one very important detail in that storage calculation, though.
Notice what's not in this command:
Get-PnPTenantSite -DetailedThere's a reason for that….
Wait… the numbers don’t add up..
At this point, everything finally ran. No authentication errors, no missing cmdlets, no certificate problems, and no access-policy errors. Success! Or so I thought. The runbook was working perfectly, but the number it was giving me wasn't. It was reporting storage usage more than a terabyte higher than the SharePoint admin center. Strangely, the total storage quota matched perfectly between the two—it was only the amount of storage being used that was wildly off.
The culprit was this: Get-PnPTenantSite -IncludeOneDriveSites -Detailed
-IncludeOneDriveSites was pulling users' OneDrive sites into my calculation.
That wasn't the storage pool I was trying to monitor, so adding those sites into the calculation massively inflated the result.
Removing it and using: Get-PnPTenantSite -Detailed
brought the number back in line with the SharePoint admin center, within rounding error.
So if your automation confidently announces that you've somehow consumed another terabyte of SharePoint storage overnight, check what you're actually adding together. This was also a good reminder that just because a script runs successfully doesn't mean the answer it gives you is correct.
Step 11: Test the Runbook
Don't immediately schedule this and assume everything works.
Inside the runbook, open the Test pane and start it manually.
First, confirm the runbook executes without errors.
Then compare the storage percentage it calculates with the SharePoint admin center. They should be reasonably close.
But there's another thing we need to test: the email.
If your tenant is currently at 70% and your threshold is 95%, you're hopefully not going to receive anything.
Temporarily change:
$threshold = 95
to something below your current usage:
$threshold = 50
Run it again.
You should receive the alert.
Then—and this is important—put the threshold back to 95 (or whatever you want it to be)
Step 12: Document Everything
Before publishing and scheduling the automation, there's one more thing I strongly recommend doing.
Document it.
I try to do this with every automation I build now, because in 6 months you’ll have no idea what you did or where you did it if you need to fix or change anything. And if you're away and someone else needs to troubleshoot it, they know even less.
The one thing I always do now: put a link to the documentation in the alert email itself.
Don't make someone receive an alert and then go searching through SharePoint, Confluence, a wiki or wherever else you've hidden the documentation.
Take them directly there.
So rather than an email that effectively says:
SharePoint storage is at 96.2%. Good luck.
I want it to say:
SharePoint storage is at 96.2%.
Here's where to investigate it.
Here's our documentation.
Here's what to do next.
An alert is much more useful when it doesn't just tell you something is wrong, but also tells you what to do about it.
Future you will appreciate this enormously.
Step 13: Make the Alert Email Useful
Once you've created your internal documentation, it's worth making the alert email genuinely useful rather than simply telling someone that storage is running low. I include links directly in the email to both the SharePoint admin center and the internal documentation for the automation, so whoever receives the alert knows not only that there's a problem, but where to go and what to do about it.
For example:
$body = @"
SharePoint Online tenant storage has reached $pctUsed%.

Alert threshold: $threshold%

Current usage:
$usedMB MB used of $totalMB MB available.

Investigate SharePoint storage:
https://admin.microsoft.com/sharepoint

Documentation / What to do next:
https://your-internal-documentation-link
"@
Obviously, replace those links with whatever makes sense in your environment. The important part is that the email shouldn't create another job for the person receiving it. If an alert says "SharePoint storage is at 98%", the next question is immediately "Okay... what do I do about it?" Giving them the relevant admin page and documentation right there means they can go straight from alert to action without having to hunt around for either.
Step 14: Publish the Runbook
Once you've confirmed:
The runbook executes
Authentication works
The storage figure looks correct
The email arrives
The links in the email work
You've changed your test threshold back
Publish the runbook.
This matters because testing the draft version doesn't automatically make that version the one Azure executes on a schedule.
Step 15: Schedule It
Finally, let's make the thing automatic.
From your published runbook, go to its schedules and select:
Add a schedule → Link a schedule to your runbook
Create a new schedule.
I run mine every 12 hours.
You could run it more frequently, but for me there's not much value in checking SharePoint storage every five minutes. I just want enough warning to know that something unusual has happened before it becomes an expensive problem.
Save the schedule and link it to the runbook.
And that's it.
You now have a SharePoint tenant storage monitor.
Every 12 hours Azure wakes up, checks your storage and disappears again.
Unless something is wrong.
Then you get an email.
The End Result..
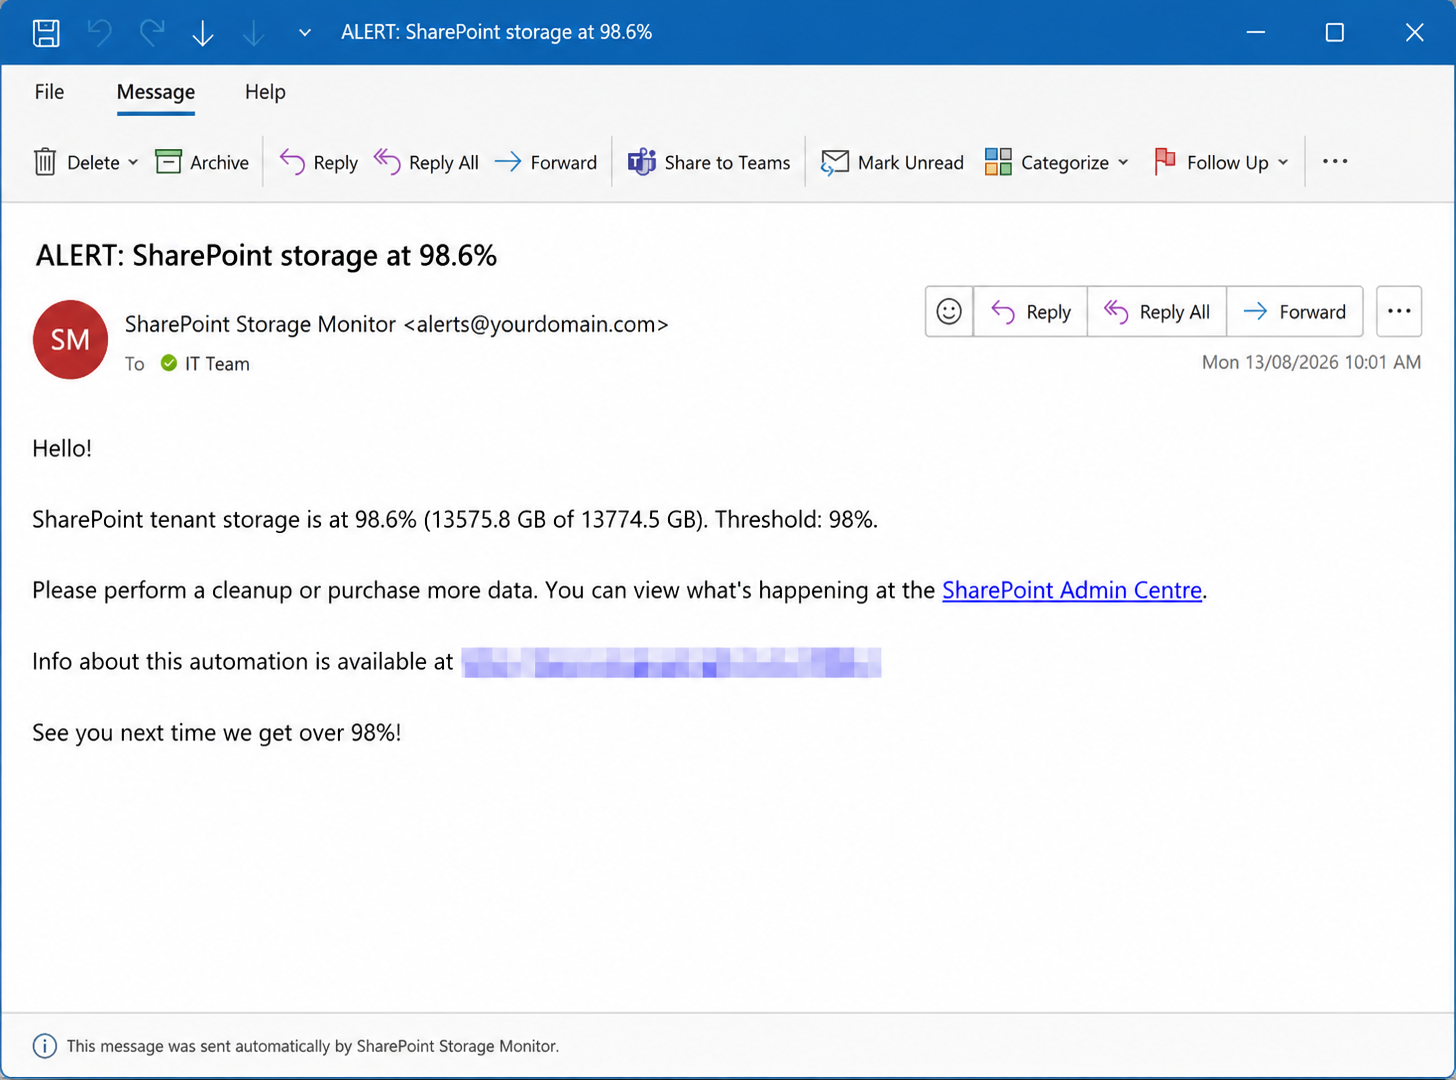
My finished version checks our SharePoint tenant storage every 12 hours. If usage crosses 95%, the email gives whoever receives it the current storage percentage and links directly to the places they need to investigate.
It also links to the documentation explaining how the automation works and what to do next.
And there's something surprisingly satisfying about seeing that email arrive when Marketing has suddenly uploaded 500 GB of media.
That's exactly what I wanted from this.
Final Thoughts
I didn't really know what an Automation Account was, what I could build with one, or whether this idea was even going to work.
I'm definitely not an Azure Automation expert now. But I got it built and it works reliably.
And I've learned enough along the way that I've started looking at other things I manually check and wondering:
"Why am I checking this myself?"
That's already turned into a few more automations that I have created (so look out for them here in the future!!)
I've built alerts for when we've exhausted our available Microsoft licences, and when more licences become available again.
I've also built one I'm particularly proud of that lets me know when a new device gets added to Apple Business Manager.
Once you get your first automation working, it's surprisingly easy to start seeing opportunities everywhere. You can also re-use a lot of what we have setup today - its just creating new runbooks (mostly!)
If you're building something similar, there are three things I'd recommend above everything else:
Check your runtime and module compatibility first.
Allow time for Microsoft 365 access policies to propagate.
And never trust an automated number until you've sanity-checked it against another source.
Document everything!
Total build time for this was a few hours, and most of that was troubleshooting rather than writing the ~20 lines of PowerShell that actually do the work.
Still, it was absolutely worth it.